How to Document Roof Damage for an Insurance Claim
When your roof sustains damage from storms, hail, wind, or other natural events, it’s crucial to document the damage properly for your insurance claim. Filing a claim can be overwhelming, especially if you don’t know what evidence your insurance company needs to process it smoothly. Proper documentation can speed up the claim, avoid disputes, and help you get the compensation you deserve.
In this guide, we’ll walk you through how to document roof damage effectively, step-by-step. We’ll also explain how PACE Home Solutions can help you at every stage — from inspection to repair. Let’s make this process clear and easy!
Why Documenting Roof Damage Matters
Before we get into the “how,” let’s quickly talk about the “why.” Insurance companies require proof of damage before approving a claim. They want to verify that:
- The damage is recent and related to the claim event (storm, hail, wind).
- The damage is severe enough to justify repairs or replacement.
- The repair costs are reasonable and necessary.
Without good documentation, your claim might be delayed or denied. Proper evidence strengthens your case and ensures you get the right settlement.
Step 1: Ensure Safety First
Before inspecting or photographing your roof, your safety must come first.
- Don’t climb on a damaged roof. It can be unstable and dangerous.
- Use binoculars or a drone if possible for close-up views.
- Stay on the ground or a secure spot when taking photos.
- If you feel uncomfortable, call a professional inspection team like PACE Home Solutions to assess the damage safely.
Step 2: Document the Date and Time of the Damage
When documenting damage, always record when the event occurred.
- Note the exact date and time of the storm or incident that caused the damage.
- Take timestamped photos or videos if your device allows.
- Keep a journal or note of weather reports or news articles about the storm.
This timeline helps your insurance company verify the claim is timely and legitimate.
Step 3: Take Clear Photos and Videos
Visual evidence is the strongest proof for your claim.
- Take wide shots showing the entire roof and property.
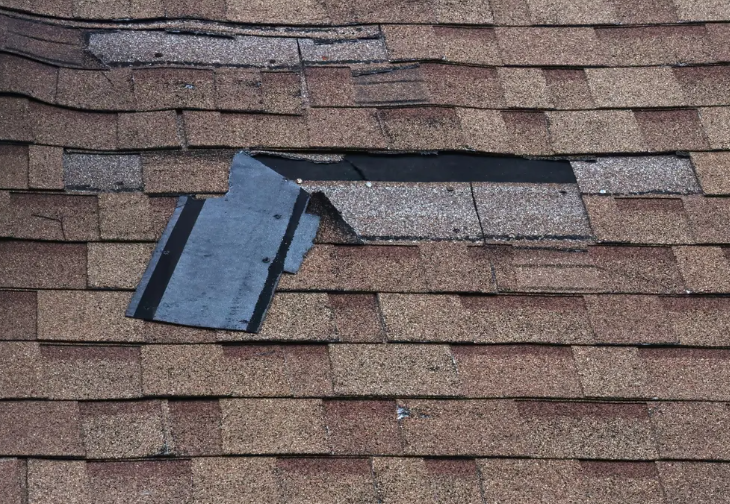
- Capture close-up shots of damaged areas (missing shingles, cracks, holes, dents).
- Photograph damaged gutters, flashing, vents, and skylights.
- Take photos from different angles and lighting conditions.
- Record video walkthroughs describing the damage verbally.
- Use a ruler or measuring tape in photos to show the scale of damage.
If you use a drone, you can get high-resolution aerial views that show the full extent of damage — a great plus for insurance adjusters.
Step 4: Write Detailed Descriptions
Photos alone are not always enough. A written description helps clarify what the images show.
- Describe the type of damage (e.g., missing shingles, broken tiles, leaks).
- Mention any visible causes, like fallen tree branches or hail impact marks.
- Note areas that might need urgent repair to prevent further damage.
- Include details about any interior damage caused by roof leaks.
Keep your description clear, factual, and avoid exaggerations.
Step 5: Collect Supporting Documents
Along with your photos and descriptions, gather any other documents that support your claim:
- Original roof installation or repair receipts.
- Maintenance records showing you took care of the roof.
- Weather reports or storm warnings related to the damage event.
- Estimates or invoices from roofing contractors like PACE Home Solutions.
These help prove the roof’s condition before and after the damage.
Step 6: Get a Professional Roof Inspection
While DIY documentation helps, a professional inspection is often necessary.
- Roofing experts can identify hidden damage you might miss.
- They provide a detailed damage report that insurance companies respect.
- PACE Home Solutions offers comprehensive roof inspections, including photos, damage assessments, and repair estimates.
- Their professional evaluation can be submitted directly to your insurer to speed up claim approval.
Step 7: Submit Your Documentation to the Insurance Company
Once you have all the evidence:
- Contact your insurance company promptly to start the claim process.
- Follow their instructions for submitting photos, videos, and reports.
- Keep copies of everything you submit.
- Keep a record of your communications with the insurer and adjuster.
Step 8: Prepare for the Insurance Adjuster’s Visit
The insurance adjuster will inspect your roof in person.
- Provide them with your photos, reports, and any professional inspection documents.
- Walk them through the damaged areas if possible.
- Point out urgent repairs to prevent further damage.
- Keep a record of the visit details, including the adjuster’s name and contact info.
Step 9: Work With a Trusted Roofing Contractor for Repairs
After your claim is approved, you’ll need repairs or replacement.
- Choose a reputable company like PACE Home Solutions for quality workmanship.
- Ensure the contractor uses materials that meet your insurance policy requirements.
- Keep invoices and work documentation for your records.
Many contractors will also work directly with your insurance company to make the process easier.
Bonus Tips for Documenting Roof Damage
- Use a smartphone or camera with good resolution.
- Back up your photos and documents in cloud storage.
- Take before-and-after photos if you make temporary fixes.
- Avoid rushing—take your time to document everything carefully.
- Stay organized with folders or digital files labeled by date and content.
How PACE Home Solutions Can Help You
When dealing with roof damage and insurance claims, having the right partner makes all the difference.
PACE Home Solutions offers:
- Professional Roof Inspections: Detailed assessments with photo and video evidence for your claim.
- Damage Documentation: Complete reports you can submit to your insurance company.
- Repair and Replacement Services: Quality roofing repairs that meet insurance standards.
- Insurance Claim Assistance: Guidance throughout the claim process to help you get the maximum payout.
Their experienced team makes the entire experience smooth and hassle-free.
FAQs
1. How soon should I document roof damage after a storm?
Document your roof damage as soon as it is safe to do so—ideally within 24 to 48 hours after the event. This quick response helps ensure that your evidence is fresh and the damage is clearly linked to the storm.
2. Can I document roof damage myself, or do I need a professional?
You can start documenting damage yourself by taking clear photos and notes. However, for best results, especially with complex damage, hiring a professional roofing company like PACE Home Solutions to inspect and document the damage is highly recommended.
3. What if my insurance company denies my claim after I submit the documentation?
If your claim is denied, review the reason carefully. Sometimes, additional documentation or a second professional inspection can help. You may also want to consult a public adjuster or an attorney who specializes in insurance claims.
Final Thoughts
Documenting roof damage for an insurance claim doesn’t have to be complicated. By following the steps outlined here and working with trusted professionals like PACE Home Solutions, you can protect your home and your wallet. Proper documentation speeds up your claim and ensures you get the compensation you need to restore your roof and peace of mind.
If you suspect roof damage after a storm or accident, don’t wait. Start documenting today, and reach out to PACE Home Solutions for expert help. Your home deserves the best care — and so do you.