How to produce Your Own Stencil A DIY companion
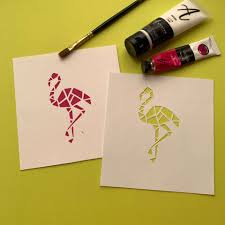
Creating your own stencil is an easy and delightful way to add a particular touch to art systems, home décor, and crafts. Whether you are designing custom wall art or decorating cabinetwork, stencils offer measureless possibilities for creativity. This DIY companion will walk you through the way of designing and casting your own stencil, no matter your skill position. So snare your tools, and let progeny start!
Why Make Your Own Stencil?
Stencils are used for numerous systems, from painting to cloth design. While store- bought stencils are extensively available, Create Your Own Stencil you the freedom to knitter designs to your specific requirements. You can replicate a particular totem, a unique pattern, or indeed a favorite quotation. Making a custom stencil ensures that your design stands out and is truly one- of-a-kind.
What You’ll Need
Before starting, make sure you have these essential accouterments
Stencil Material You can use accouterments like acetate wastes, vinyl, or indeed sturdy cardstock.
Cutting Tool A perfection cutting tool like anX-Acto cutter or a stencil knife works best.
Design Software or Pencil and Paper For creating or tracing your design.
Adhesive or Painter’s Tape recording To keep the stencil in place during operation.
Cutting Mat or face cover your work area while cutting.
Step- by- Step companion to Creating a Stencil
1. elect or produce a Design
The first step in creating a stencil is to choose or design the image or textbook you want to use.However, design software similar to Adobe Illustrator, Photoshop, If you’re tech- expertise. For simple designs, sketching by hand works just as well.
When designing your stencil, consider the complexity of the shapes and lines. Simple, bold designs with clean edges are easiest to cut and apply. Avoid intricate details, especially if you’re just starting.
2. publish or Draw the Design on Stencil Material
Once your design is perfected, publish it out or transfer it to your stencil material. However, you can place the published design beneath and trace it directly onto the distance, If you are working with a transparent material like acetate. For cardstock, you can publish the design directly onto the material.
3. Secure Your Stencil Material
Before slice, tape recording down your stencil material to a stable slice face like a mat or a sturdy table. This ensures your stencil does n’t move while you are working, allowing for precise cuts.
4. Cut Out the Design
Using your perfection cutting tool, precisely cut along the lines of your design. Start from the center of the stencil and work your way outwards. Make sure your slice blade is sharp to avoid jagged edges.
Flash back to leave” islands” in areas where there are enclosed shapes( like the middle of letters similar as” O” or” A”). These small connecting lines will help hold the stencil together.
5. Clean Up the Edges
After cutting, go back and clean up any rough edges or uneven cuts. Use your slice tool to trim any slapdash material. This step is pivotal for icing crisp, clean lines when applying the stencil to your design.
6. Test Your Stencil
Before applying your stencil to your final design, do a test run on a scrap face. This helps you see how well the design transfers and reveals any areas that might need farther trouncing or adaptations. It’s also an excellent occasion to exercise your operation fashion.
Tips for Using Your Stencil
Secure the Stencil When applying your stencil, use painter’s tape recording or tenacious spray to keep it in place. This prevents shifting and ensures clean lines.
lower is further If you’re painting with your stencil, use a small quantum of makeup and make up the color gradationally. overfilling the encounter or comber can beget the makeup to transude underneath the stencil, blurring the design.
Stencil Brushes Stencil skirmishes or froth breakers are great for applying makeup unevenly over the stencil.
Drawing Between Uses If you are using the stencil multiple times, clean it between operations to help makeup make- up, which can beget smudging.
Final studies on DIY Stencils
Creating your own stencil gives you complete control over your design, allowing you to customize any design. Whether you’re stenciling a wall, a piece of cabinetwork, or a T- shirt, the particular touch will elevate your final product. Plus, the process is both satisfying and cost-effective, making it perfect for crafters of all situations.
Still, creating a stencil is a fantastic place to start, If you’re ready to attack your coming DIY design. So gather your accouterments and get creative you’ll be amazed at the professional- looking results you can achieve with just a little trouble!


Post Comment